
Error Code 232404 is a standard error code encountered in various computing systems and applications. This error code typically indicates a problem with the software or system and can cause significant disruptions to your work or entertainment. The specific meaning of Error Code 232404 can vary depending on the context in which it is encountered, but it is always an indication that an issue needs to be resolved.
There are several potential causes of Error Code 232404, ranging from outdated software or drivers to network connectivity issues and malware infections. The steps required to resolve Error Code 232404 will depend on the specific cause of the issue. Still, they may include updating software, disabling conflicting programs, freeing up disk space, and scanning for malware.
Contents
Common Causes of Error Code 232404
There are several possible causes of Error Code 232404, including:
- Corrupted or outdated software: If the software or application is outdated or has become corrupted, it may trigger Error Code 232404.
- Conflicts with other programs or drivers: Conflicts between the software or application in use and other programs or drivers on the system can cause Error Code 232404.
- Insufficient memory or disk space: If there is insufficient memory or disk space available on the system, it can cause Error Code 232404.
- Network connectivity issues: If there are network connectivity issues, it can cause Error Code 232404.
- Malware or virus infections: If the system is infected with malware, it can cause Error Code 232404.
Steps to Fix Error Code 232404
As a result, if you are encountering Error Code 232404 and would like to try and resolve it, there are a few steps that you can take to do so. Here are a few steps to try:
Clearing the browser cache and cookies is a simple step that can resolve many issues with the media player in Chrome.
- Click the three dots in the upper right corner of the browser.
- Click “More Tools” and then “Clear Browsing Data.”
- Select “Cached images and files” and “Cookies and other site data” in the options.
- Choose the desired time range and click “Clear Data.”
Disable extensions
Disabling extensions in Google Chrome can help resolve issues with the media player caused by conflicting extensions. Extensions are small software programs that add specific features to the browser and can sometimes interfere with the media player.
- Click the three dots in the upper right corner of the browser.
- Click “More Tools” and then “Extensions.”
- Toggle the switch next to each extension to turn it off.
Check the firewall and antivirus settings
Firewall and antivirus software may block the media player; adding the website to the exception list or temporarily disabling the software can resolve the issue.
Firewall
- Go to the Control Panel on your computer.
- Click “System and Security.”
- Click “Windows Defender Firewall.”
- Check if the firewall is turned on or off.
- Check if there are any specific rules set up for your browser or any website that you are having trouble accessing.
Antivirus
- Go to the Control Panel on your computer.
- Click “System and Security.”
- Click “Security and Maintenance.”
- Look for a section related to antivirus or security software.
- Check if the antivirus software is turned on or off.
- Check if there are any specific rules set up for your browser or any website that you are having trouble accessing.
Note that these steps may vary slightly depending on your operating system and the specific firewall or antivirus software you are using. If you find that the firewall or antivirus is blocking access to a website or causing other issues, you can try temporarily disabling it or adding exceptions to see if it resolves the problem. However, be aware that doing so may decrease the security of your device.

Update Adobe Flash Player
Updating Adobe Flash Player can help resolve issues with the media player in Google Chrome. Adobe Flash Player is a software program required to play certain types of media content, such as video and audio. An outdated version of Adobe Flash Player can cause compatibility issues with the media player in Chrome.
Go to the Adobe Flash Player website (https://get.adobe.com/flashplayer/).
Click the “Check Now” button to check if you have the latest version of Flash Player.
- If an update is available, click “Download now.”
- Follow the on-screen instructions to install the update.
- Restart your browser for the changes to take effect.
It is recommended to keep Adobe Flash Player up to date in order to receive the latest security and performance improvements. Note that Adobe Flash Player will eventually be phased out, as most modern websites have stopped using Flash in favor of HTML5 and other technologies.
Reset Chrome
Resetting Chrome can resolve the issue if there is a problem with the browser settings. Resetting Google Chrome can help resolve issues related to web browsing such as slow performance, difficulty loading pages, and errors caused by settings or extensions. Here’s how to reset Google Chrome:
- Click the three dots in the upper right corner of the browser.
- Click “Settings.”
- Scroll down to the bottom and click “Advanced.”
- Scroll down to the bottom and click “Reset and clean up.”
- Click “Reset settings to their original defaults.”
- Confirm the reset by clicking “Reset settings.”
Note that resetting Google Chrome will erase your browsing history, saved passwords, and other settings. You will need to reconfigure your settings and reinstall any extensions that you had previously installed. After resetting, restart the browser to see if the issue has been resolved.
Try Incognito mode
If the issue is caused by a problem with the browser extensions or plugins, trying Incognito mode can resolve the issue. Using Incognito mode can help determine if extensions, cache, or other settings are causing an issue with web browsing. In Incognito mode, your browser does not save your browsing history, search history, or cookies, and any extensions you have installed are disabled. Here’s how to use Incognito mode in Google Chrome:
- Click the three dots in the upper right corner of the browser.
- Click “New incognito window.”
- A new window will open with a black background and the incognito icon.
- In Incognito mode, try to reproduce the issue you were experiencing. If the problem does not occur in Incognito mode, it may be caused by one of the factors mentioned earlier, such as an extension, cache, or setting. If the issue does still occur in Incognito mode, the problem may lie with the website or your internet connection.
Disable hardware acceleration
Disabling hardware acceleration in your web browser can help resolve issues related to web browsing, such as slow performance, difficulty loading pages, and visual problems such as choppy graphics. Here’s how to disable hardware acceleration in Google Chrome:
- Click the three dots in the upper right corner of the browser.
- Click “Settings.”
- Scroll down to the bottom and click “Advanced.”
- Scroll down to the “System” section.
- Toggle off the switch next to “Use hardware acceleration when available.”
After disabling hardware acceleration, restart the browser to see if the issue has been resolved. If the problem persists, you may consider re-enabling hardware acceleration and trying another solution. Note that hardware acceleration can improve performance and make certain web content display correctly, so it is generally best to leave it enabled unless it is causing issues.
Reinstall Chrome
If none of the above steps worked, reinstalling Chrome can resolve the issue. Reinstalling Google Chrome can help resolve issues related to web browsing, such as slow performance, difficulty loading pages, and errors caused by corrupted files or other problems. Here’s how to reinstall Google Chrome:
- Uninstall Google Chrome from your computer:
- Windows: Go to Control Panel > Programs > Programs and Features, select Google Chrome, and click Uninstall.
- Mac: Go to Applications > Google Chrome, drag Google Chrome to the Trash, and then empty the Trash.
- Download the latest version of Google Chrome from the Chrome website (https://www.google.com/chrome/).
- Install Google Chrome by double-clicking the downloaded file and following the on-screen instructions.
Reinstalling Google Chrome will erase your browsing history, saved passwords, and other settings. You will need to reconfigure your settings and reinstall any extensions that you had previously installed. After reinstalling, restart the browser to see if the issue has been resolved.
If the above steps do not resolve Error Code 232404, you may need to contact the software or application vendor for further assistance.
Preventing Error Code 232404
The best way to prevent Error Code 232404 from occurring again in the future is to take a few steps to maintain the health of your system and software to avoid it from happening in the first place. Here are a few tips:
- Keep software and applications up to date: Regularly update them to ensure they are functioning correctly and prevent conflicts with other programs or drivers.
- Maintain adequate memory and disk space: Keep an eye on the amount of memory and disk space available on the system and free up space as needed to ensure sufficient memory and disk space.
- Keep the system protected from malware and viruses: Regularly scan the system for malware and viruses and keep the system protected with up-to-date antivirus software.
- Monitor network connectivity: Regularly monitor the network connectivity to ensure no connectivity issues could cause Error Code 232404.
- Regularly back up essential data: Regularly back up important data to a secure location to ensure that it is protected in the event of a problem with the system or software.
Suppose you still encounter Error Code 232404 after following the steps outlined in this article. In that case, it may be necessary to seek assistance from the software, application vendor, or a professional. With the correct information and guidance, resolving Error Code 232404 is a straightforward process that can save you time and hassle in the long run.
FAQs
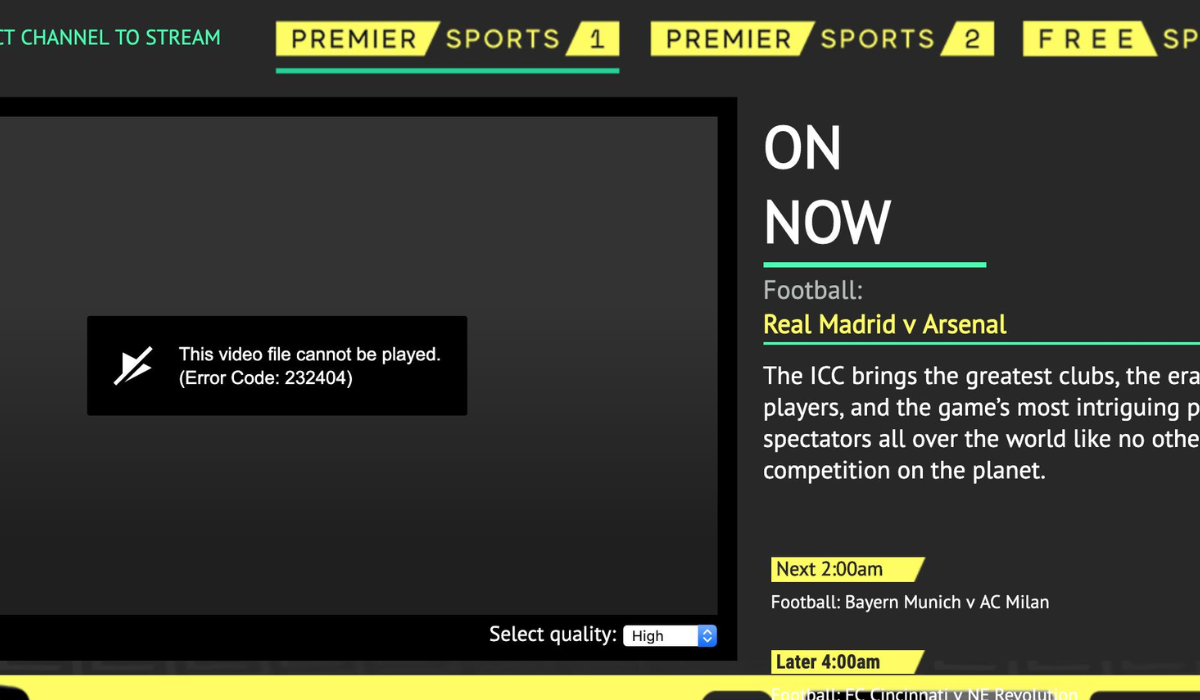
What exactly does “couldn’t load media” mean?
Browsers frequently stall when opening a specific website, rendering an image, or playing a video. “The media could not be loaded, either because the server or network failed or because the format is not supported,” is a common error message seen during video playback in the Chrome browser.
How do I resolve error 232404?
Utilize Incognito Mode. If the extensions cause the “Error loading media: File could not be played” or “this video file cannot be played. (error code: 232404)” error, you can quickly resolve it by using the Incognito mode.
How do you correct a media error?
If Windows Media Player stopped working properly after the most recent Windows Update, you can use System Restore to confirm that the update is to blame. To do so, go to the Start menu, and type system restore. Select Create a restore point, followed by System Restore in the System Properties pane.
Conclusion
Error Code 232404 can be a frustrating experience, but it can be resolved with the correct information and guidance. The root cause of Error Code 232404 can vary, but by following the steps to identify the issue and fix the problem, you can get your system or software back up and running smoothly. Taking proactive measures to prevent Error Code 232404 from happening in the future is also essential. This can be achieved by regularly updating software and drivers, freeing up disk space, maintaining a healthy system, and backing up essential data.