

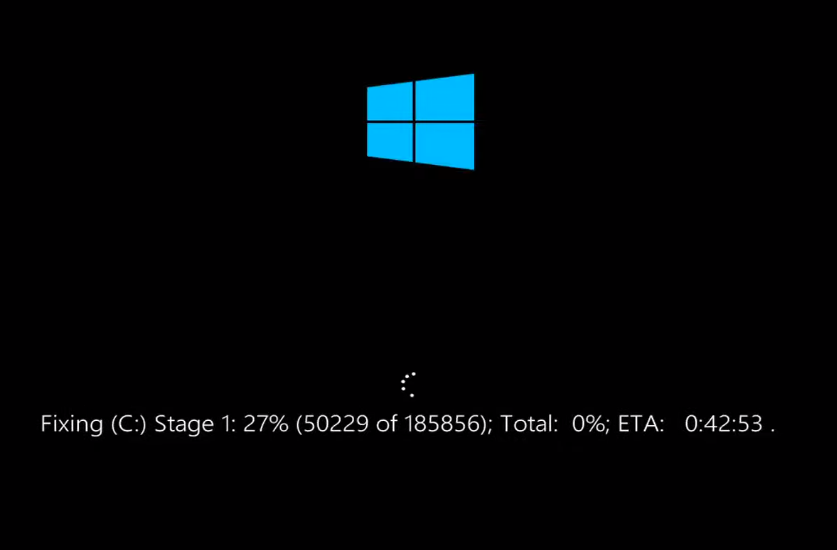
“fixing C stage 1” is an error encountered during the startup of a system. This causes a lot of delay in the opening of the Windows Home screen. Sometimes it does not even proceed further than 45% progress.
Today we will discuss the various ways that can be implemented to rectify this issue, what are the multiple reasons that lead to this nuisance, and how one can prevent it from happening in the future.
Contents
Causes of Fixing C Stage 1
The various reasons that can give rise to this issue are:
- Improper shutdown.
- Power failure.
- Corrputed hard drive.
- Heavy load and many junk files on the hard drive.
- Damaged hard drive.
Prevention Methods:
- Make a backup of your files.
- Upgrade to a Solid State drive.
- Use a SATA SSD for your system.
- Do not install or download files from untrustworthy sites.
4 Ways to Rectify ” fixing c stage 1″
Progress is plodding when your laptop displays the black screen with text of Fixing C stage 1 or some other stage value. Then you can try to speed up the progress speed by pressing the Power Button for just two seconds, not more than that, or the system will shut down.
For PC, use the power button situated on the CPU or the monitor.
This will not rectify the error but can speed up the loading.
Using the Registry Editor:
Once your Windows home screen shows up, refresh it and perform the following steps:
- Open the Run Command. (Win key + R)
- Type Regedit on it, hit Enter.
- In the path area, copy paste the below path:
- HKEY_LOCAL_MACHINE\SYSTEM\CurrentControlSet\Control\Session Manager
- Double click on the file named “Muti-String”.
- Change the value data to : autocheck autochk /k:C *
- If the error for you is not due to the C drive but with some other drive, then mention that Drive name instead of “C”.
- Click on “OK”.
- Restart your device.

Chkdsk Command:
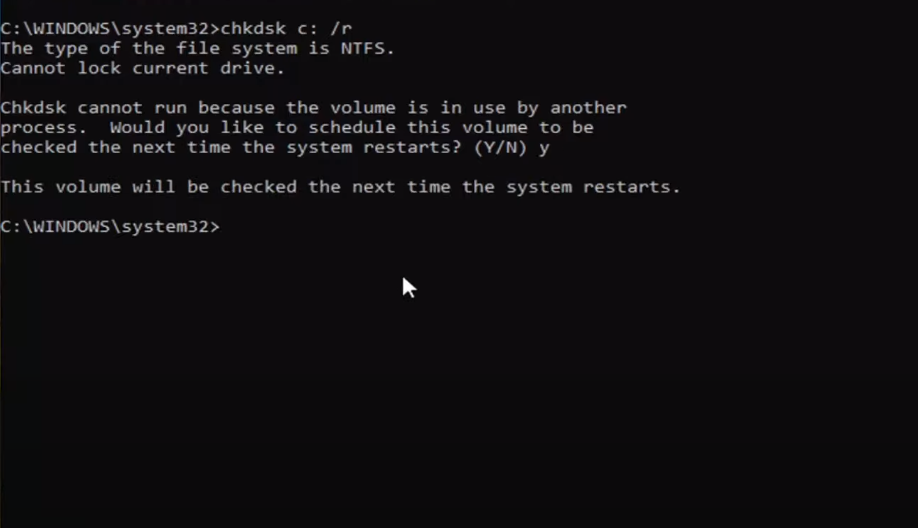
You can prevent the errors caused in the drive, which leads to fixing c stage 1 and then stage 2 by using the Command Prompt.
- Run Command Prompt as an Administrator.
- It will prompt for permission, click on YES.
- Type: “chkdsk c: /r”
- Press the Enter key.
- If the Command Prompt asks to schedule the disk to be checked, type “y” which is for yes. Hit Enter button.
- Restart your computer.
Using chkntfs command:

- To remove the “fixing C stage 1”, open the command prompt using the Administrative privilage.
- Type the following:
- chkntfs /x c:
- Hit Enter.
- Restart or reboot your device.
If your loading screen still shows the progress bar with Fixing c stage 1, you will have to show it to a technician to replace the corrupted hard drive.

How to rectify “Fixing C stage:1
It occurs at the drive where Windows is installed (C Drive). It is either caused by a corrupted folder or application, or the disk is old and incompatible with the latest updates. Try resolving these two issues to fix them.
How to end: fixing c stage 1 loop
If the loading progress bar for Stage 1 is very slow or stuck for many minutes, then try pressing the Power button for two seconds only. Pressing it for much time will shut the device down. Pressing the power button for less time can help in fastening the speed.
Acer laptop and Dell laptop shows fixing c stage 1, how to fix
Try using the commands “Chkntfs”, “Chkdsk” commands in your Command Prompt. If it did not solve the issue, open Registry Editor and change the Edit String value and add /k:C* to its end.
What is Fixing C stage 2 in Windows 10:
There can be a maximum of four stages when your system tries automatically to fix the inconsistency in the drives. The second stage arrives after the first stage. The second stage is usually shorter than the first stage.

FAQs on Fixing C Stage 1
How to stop “Fixing C stage 1” scan during device startup?
You can use the below ways to fix this issue:
1. Long press the Power button for only 2 seconds.
2. In the registry editor, change “autocheck autochk” to autocheck autochk /k: C *
3. Using the CHKDSK command.
4. Using the CHKNTFS command.
What are the various causes that can lead to this issue?
The different factors are:
The shutdown of the system was not done correctly.
A power failure.
Corrupted hard disk.
Heavy load and many junk files on the hard disk.
Damaged hard disk.
How long does the “Fixing C stage” scanning takes, and maximum, how many stages can it have?
The scanning and fixing of this problem can take from 20 minutes to nearly an hour. There is a maximum of four stages in it.
Winding up
We have discussed the four ways to stop the automatic scanning and fixing of the default Hard Disk Drives. You can ping us anytime to ask for solutions for other concerning topics, using the comment box available at the bottom of the page.