


Network stack bios: Do you know that there are two ways to operate and modify the BIOS? Yes, the first one is the most common way, the default option, using the HDD (Hard Disk Drive) to operate the BIOS. The hardware components of your system are used for this.
The second one is Network Stack BIOS. We will discuss this in detail now.
Contents
What is network stack bios
It is to run the BIOS of your device through the internet and networks around it, instead of your computer’s Hard Drives. This is very useful when you have a corrupted Hard Drive or use the PXE (preboot execution environment). The Preboot Execution Environment does the same thing a rebooting would do, but only with minor changes.
When to use network stack bios:
It would help if you were liable to choose to option under certain circumstances only. Even though it is not advised to keep this ON in the settings of the BIOS, it will not lead to any harm to your device. So, you should enable this option of Network Stack BIOS in your system when:

- The hard drives are corrupted or not working, but you need to reboot successfully.
- Install an Opersting System (OS) from the client side server.
How to enable Network stack BIOS:
For this, you will have to open the BIOS or UEFI settings in your system. To do this, follow the below simple steps:
Open the BIOS settings:
- Open the Settings. You can search this in the Start menu.
- Choose Update And Security.
- From the left menu, select the Recovery option.
- Under the Advanced startup, select the option of Restart Now.
- Move to Troubleshoot.
- Select the Advanced options.
- Click on the BIOS or the UEFI Firmware Settings.
- Hit Restart.
- The BIOS panel will start in show up in some time.
Enable the Network Stack in the BIOS Settings:
- There will be an option of Advanced Boot Options at the top left.
- With the help of the right arrow keys, move to there.
- Use the down arow keys to reach at the NETWORK STACK.
- Enable the Network Stack by choosing the Enable option for it.
- Hit the Apply option. Press F10 to exit from the BIOS after saving it.
- Restart your device.
How to disable Network stack BIOS?
- Move back to the BIOS configuration panel, also known as the UEFI panel.
- In the Advanced Boot Options, turn off the Network Stack option.
- Hit Apply.
- Press F10 and exit.
- Restart or reboot your device.
What is Network Stack in Asus Bios?
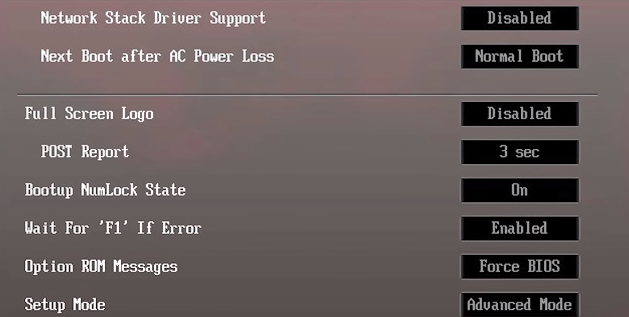
In the BIOS setup configuration of ASUS, you can find the Network Stack under the Advanced settings. This helps in booting through the internet/network connections instead of using the hard disk drives for restarting and booting.
Intel Bios Network stack settings Ubuntu 14:
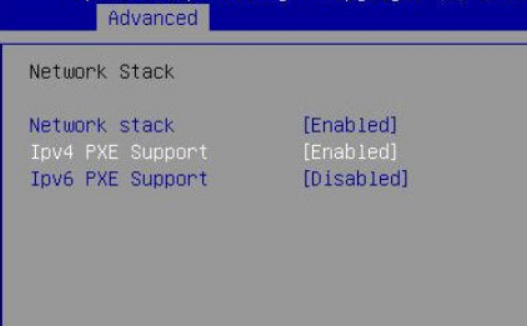
On pressing the F2 button while the restarting and powering ON takes place, the BIOS screen is visible in the Ubuntu and Linux OS systems. Under the “Advanced” menu, you can notice the Network Stack Bios option in there. This can be enabled to start the PXE services.
How to enable network stack OptiPlex 7010 bios:
This can be done through the UEFI settings/ BIOS settings of the system. If you are still not able to boot by using this method, then try updating the drivers and BIOS by moving to the official website of the company: https://www.dell.com/support/home/en-in/Products/?app=drivers
For what does it helps:
It helps to boot your device when it cannot achieve it with the help of Hard disk drives.
It helps in enabling the PXE (preboot execution environment).
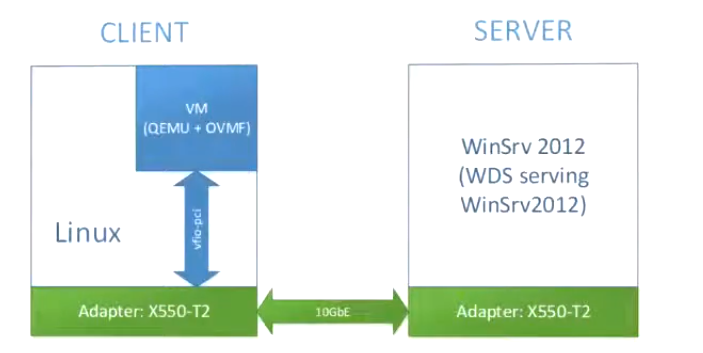
This is applied in updating and installing the OS through a network, usually the client-server. This is done by having an internet connection.
FAQs on network stack bios:
Where can I find the Network-Stack in the BIOS?
This feature is available in the Advanced Boot Options tab of the BIOS panel.
Is it safe to enable the Network stack BIOS?
Yes, there will e no harm occurred in your device when you enable it. But the system should need to boot using the hard disk drives for the proper functioning of the drives.
How can I enable the Network Stack in the BIOS
Open the BIOS/UEFI configuration panel.
Move towards the Advanced Boot Options.
Change “Network Stack” from diable to “Enable.”
Save and exit by pressing F10.
Should the Network Stack be enabled in bios?
If you do not work in a company and have no tasks like PXE booting the device, there is no need to enable the Network Stack in your BIOS. Enabling this will prevent your computer from booting from the hard disk. This is important to fix errors in the disks.
Conclusion:
There are a few essential things available in the BIOS configuration which must be known to everyone. We hope that article has helped you know about the Network Stack situated in the BIOS Configuration.
If you have any other queries regarding this or any different topic, you can contact us by using the comment box available at the bottom of the page.