

Consider yourselves in a situation where you always keep your data and all the other stuff in one device only and that it is your device that you use for all of your daily purposes and can not live without it, i.e., you rely on it too much that any data losses would render you helpless and out of your mind! Well, no need to imagine! It is pretty much like that. We rely on our data in this data-driven age, so it becomes necessary to commit to safeguarding your data.
Luckily, there is this excellent way out of this problem known as robocopy backup mode, and that is, fortunately, the title and the central premise of today’s discussion here at toolspond.
Don’t worry even a bit if you are finding out the name of the service we are discussing, i.e., Robocopy backup mode, for the first time. We understand that, and we will lead you from the very start to the end. You shall find yourself completely comfortable with Robocopy as an application and Robocopy backup mode as a successful and effective way out of your data backup problems! But first, we shall tell you why it is vital to backup data in today’s progressive but dangerous technological era.
Contents
What is the significance of Robocopy backup mode?
Taking backup of anything nowadays is a necessity in today’s environment. There has been a rapid increase in virus and malware attacks that sometimes penetrate your device’s safety walls, leading to the loss of your crucial data. Moreover, sometimes there might arise some system errors which might lead to partial or total data losses; sound technology is a pretty intense thing, right?
To prevent potential data losses and consequential losses arising from it, there are many options through which a user can back up their data and stop worrying about its safety. If you are a windows user, Microsoft windows 10 gives you various options. You can even choose whether to backup and restore your whole system or just some specific file.
Now, if you are a security and file safety obsessed person, you might have been using the tools to restore and backup your precious data. The most common process one might follow is to copy all the files to an external hard drive and take all of your back-ups in it and then t, but the process is tedious o requires a lot of time and patience. Luckily, a fantastic thing called robocopy backup mode can work more smoothly and concisely.
How to use robocopy backup mode?
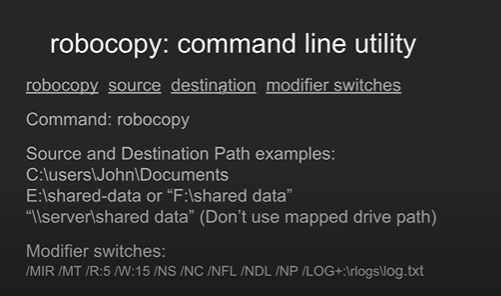
Robocopy backup mode is a command-line mode that runs on one command and uses directories and subdirectories to execute the commands. Our research team has noticed how things work in robocopy backup mode and developed a streamlined process for any novice to understand.
What happens is that there is a basic command script with some essential elements. Many elements and variables are defined by Microsoft, which lets users alter or change the way their files and data get backed up! Hence robocopy backup mode caters to the demands of every user individually.
Basic command script of Robocopy backup mode:
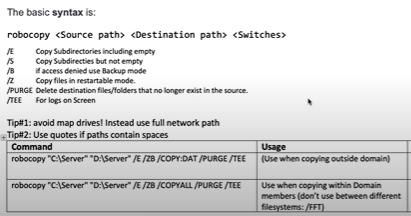
Here is the basic command script that robocopy backup mode follows. Please note that this will create the basic command that will be used, and all the other subsidiaries would depend on the use case for which we intend to use Robocopy backup mode. In simple words, This command shall backup your system files to the directories and signify that only, but where to backup and which ones to backup would be chosen by the addendums that would be added after typing the whole command.
The command script that robocopy backup mode generally follows is as follows :
Robocopy "C:\Users\Administrator" Now This above command would show the backup directory. If you want to include the actual directory of the backup, which is pretty much recommended, the command becomes the following :
Robocopy "C:\Users\Administrator" "F:\Backup"The above command would mean that you intend to backup in a drive F in the folder named “backup,” which could be internal or external. This would be the actual target directory. Here you can and have to change the administrator name to your device’s administrator. For simplicity, we shall let it be this way in this article, but do not forget to change it to the name of your device’s administrator, for example, C:\Users\Chandan.
Definitions of Copy Command lines in Robocopy backup mode
| /s | Subdirectories are copied. Empty folders are not included in this option. |
| /e | Subdirectories are copied. This option also covers empty folders. |
| /b | Backup mode copies files. |
| /efsraw | In EFS RAW mode, copies all encrypted files. |
| /copy | Specifies which file properties to copy. The valid values for this option are : D- Data T- timestamp A- attributes |
| /dcopy | Specifies what to copy in directories. The valid values for this option are D, A, and T |
| /purge | Removes files and folders from the destination that no longer exist in the source |
| /mir | Mirrors a directory tree (equivalent to /e plus /purge). Using this option with the /e option and a destination directory overwrites the destination directory security settings. |
| /mov | After copying files, it moves them and deletes them from the source. |
Like these copy commands, there are some file selection command lines as well which are: /xjd,/a, etc.
Reference: Microsoft Docs
Use cases of some command lines in Robocopy backup mode :
Let us assume you wish to back up every folder in the source, including any empty directories containing future data. You also don’t want things from my hard drive on the backup. While the /S and /PURGE switches might be used to achieve your aim, the /MIR option allows me to do both jobs with only one switch. Now the command will be:
Robocopy "C:\Users\Administrator" "F:\Backup" /MIRWe shall use the /XA: SH command switch to exclude the hidden system files. At the same time, you can also use the /XD (folder name)to exclude and neglect the whole folder. Let us take the folder name as “”hone data.”” Now it is mandatory to exclude all the junction points, and windows use junction points to link data to its folder; hence we shall use /XJD. The new Robocopy backup mode command will be :
Robocopy "C:\Users\Administrator" "F:\Backup" /MIR /XA:SH /XD Phonedata /XJDWhen Robocopy detects a file in use, one of its most valuable features kicks in. When this happens, Robocopy will halt and wait for the file to be closed before continuing with the copy procedure. Every 30 seconds, it will try to duplicate the file again. The default retry count is one million (no kidding!). You should set it to a sensible quantity because this will almost certainly prevent the backup procedure from ever finishing.
The /R switch is used to modify the number of retries. The /W option is used to alter the time between retries. With a 10-second wait time, we will pick five retries. After a fair number of retries and a waiting period, Robocopy will succeed. The command would be now :
Robocopy "C:\Users\Administrator" "F:\Backup" /MIR /XA:SH /XD Phonedata /XJD/R:5 /W:10Robocopy can copy many files in parallel, resulting in rapid backup processes. /MT[:n], where n is a number between 1 and 128 that indicates the number of threads to be used. Hence the command would be now :
Robocopy "C:\Users\Administrator" "F:\Backup" /MIR /XA:SH /XD Phonedata /XJD/R:5 /W:10 /MT[:n]You can choose any n between 1 to 128 as per your requirement.
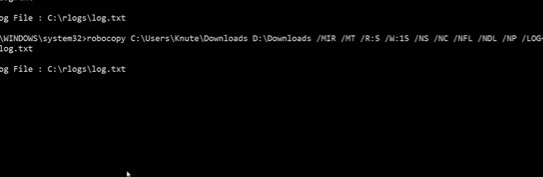
Robocopy also tells us the status of the backup process initiated like every backup command line tool./V is the command for that. You can also use it at your convenience. Create your log file. You can use / the LOG switch.
Robocopy "C:\Users\Administrator" "F:\Backup" /MIR /XA:SH /XD Phonedata /XJD/R:5 /W:10 /MT[:n] /V / LOG :log name.logRobocopy vs. Xcopy
| Robocopy is used as a mirroring tool, i.e., it will synchronize directories. | Xcopy, on the other hand, copies files from one directory to another. |
| Robocopy will check the destination directory and remove the files, not in the main tree. | It will not check anything like that and will copy unchanged files. |
| It’s a Run Hours switch (/RH) that can schedule when copies are done. | Copy doesn’t have any such option. |
| The average Disk Transfer IOPS is better for Robocopy | maximum Disk Transfer IOPS is better for XCopy |
FAQs
How do I use robocopy for incremental backup?
Press the Win+R key to open the “”un” “window. Enter “”MD” “and hit OK.
To execute the first-time backup, type the command and click Enter.
You may use Windows Task Scheduler or add settings to Robocopy to complete incremental backups regularly.
How to specify Maximum file size in robocopy backup mode
/max:<n> : It determines the maximum file size (to exclude files bigger than n bytes).
Is robocopy suitable for backup?
One advantage of Robocopy is that backups can be executed via batch files.