

On starting your system, does it suddenly shows “diskette drive 0 seek failure” or “Floppy diskette seek failure” on a black background? And you are worried about how to resolve this diskette or a floppy issue? Then you have come to the right spot. We will explain in-depth what is causing it and how to fix it.

Contents
What is this diskette drive 0 seek failure?

When the system is not able to boot or reboot successfully through a bootable device or a floppy disk drive, the seek failure of diskette drive 0 pops up on the monitor. A diskette drive is nothing but a floppy disk drive. Usually, the drives A and B of the systems. This is a removable magnetic storage disk. But replacing this disk is not the first preferred option to solve this problem, as most of the errors can be settled out manually. But in few rare cases, if the diskette drive gets too much corroded and damaged, then there is no other alternative than to replace the damaged disk with a new and working one.
What causes it?
There is just a blank black screen, which does not allow the user to proceed further. But what causes this?
There are mainly three reasons that can cause this small nuisance:
- Your system is trying to boot from a non-bootable device or wires are not connected properly inside your CPU.
- Unsuitable boot sequence.
- Failed hard drive.

Fixing “diskette drive 0 seek failure” or “Floppy diskette seek failure”:
Solution 1: Loose wires
Initially, unplug all the other unnecessary devices. (e.g. : USB, consoles) and try to restart your computer. If this does not works out, and you are a hardware nerd, then check at the core of the CPU by opening it, and check if all the wires are connected properly.
Solution 2: Set correct boot sequence
For different versions of computers, there are different ways to fix them. You can try all of these to correct the boot fetching manually:
- When the black screen appears with Bold white text of “diskette drive 0 seek failure” or “Floppy diskette seek failure”, press F2 on the keyboard, which will take you to a menu called BIOS CMOS Setup Utility, where you can alter the BIOS CMOS settings.
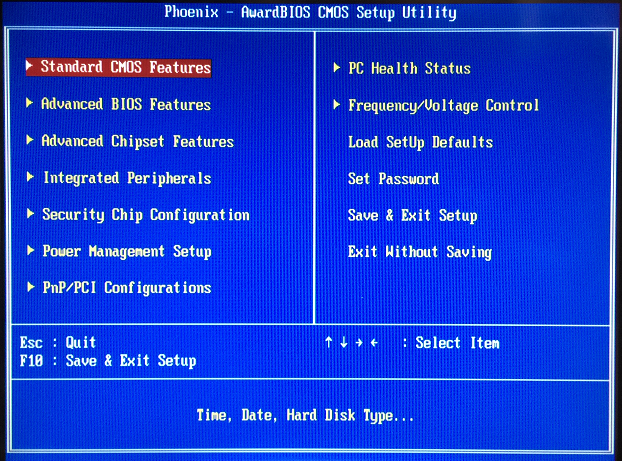
- Here, you can use the keyboard keys only for navigation, the mouse cannot be used in here. Then you Here, you can use the keyboard keys only for navigation. Then you can select the Maintenance option on the right side by using arrow keys. Then select load defaults, by which default drives will be used to boot the machine, and not something else. Press esc button, save and exit.
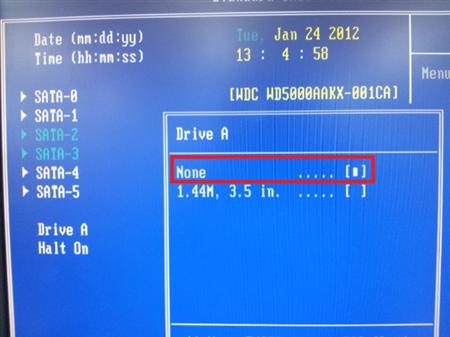
- If the above method didn’t work, select the “Standard CMOS Features” panel from the right side after pressing F2 key. From the newly appeared screen, choose none (or) disable as the option for Drive A (or) Floppy, if available in the menu. Then Save and Exit.
- If these didn’t work, from the black screen of “Floppy diskette dseek failure” or “diskette drive 0 seek failure”, press F2, select the panel of integrated peripherals, which will also be at the right side, then for “Onboard FDC Controller”, select disable, save and exit after pressing the Esc button.
- In the BIOS CMOS Setup Utility, if there is a “Drives” item at the right, use the arrow keys to move towards that panel. Select Diskette drive as “OFF” if some other options is chose. Hit escape button, choose save and exit. This will restart your computer.
Solution 3: Replace the hard drive
The hard drive might be completely screwed up if any of the above-mentioned methods didn’t work. The only choice left is to show the computer to a technician, who may suggest replacing the damaged hard drive.
Specific solutions for specific issues
Alert, Voltage of system battery is low!:
It donates that the voltage flushing into the Hard drives is very less. You can indicate this to a technician who will open the CPU, and reset the wires attachment with the Diskette drives.
For Windows 10:
Enter the BIOS CMOS mode by pressing F2. Now change the path of the floppy as disable or none.
For Windows XP Home Edition and DELL:
Move to set-up, after pressing F2. Navigate to drives at the right side, and choose it. From the new options that appear, select OFF next to Diskette Drive and hit F10 to close and save it.
For Windows Vista:
Switch to BIOS CMOS mode and replace 1.44, (few numbers) with NONE for Drive A:

FAQs Related to Diskette Drive 0 Seek Failure
1. What does a diskette drive mean?
It is similar to a floppy disk drive, where the users of the computer can perform specific operations only, like writing and reading.
2. Can floppy disk error be fixed manually?
Check in the BIOS CMOS Setup utility, whether the primary boot device is not set for floppy drive settings, and then choose Hard disk from the available options.
3. What is the purpose of a diskette?
A diskette is used in a pc to store data in it. It is a removable RAM (Random Access Memory). It is positioned inside a strong cartridge and has 89X89 millimeters of dimension with few millimeters of height.
Winding Up
This minute error of Floppy and Diskette drive seek failure can result in many delays in your important works on your system. The above-provided solutions work most of the time. Do leave your valuable feedback below so we can know your thoughts on this.